
You can carve a fresnel lens pattern into a piece of plexiglass with a pattern-scraping, radial cutting arm you build yourself.
The Long Version:
A fresnel lens is a lens that has been cut down to size. If you take a full-size, spherical lens and chop it into concentric circles, then cut the cylindrical portion of every piece off, you'd still have almost the same magnification power of the full-size lens from only a fraction of the material, be it glass, plastic, or crystal. That is a Fresnel lens. Pretty clever stuff. Like this:

A Fresnel lens of about one square meter has been demonstrated on other blogs to generate about 1000 degrees Fahrenheit. That's not enough to do much steelsmithing, but it's a start. If I had one that was four square meters, that would really be something.
And it could be done cheap. With...
Five pieces of lumber
Four sheets of plexiglass (one square meter each)
Three bowsaw blades (totalling about 1.4 one meters in length; two may suffice)
Two strong cross-braces
And a brass dowel just for pretty. (1/4" is good)
Okay, there are a couple more things, but nothing else to buy assuming you have a flat work surface, tools, etc.
Using these, I could make a Fresnel lens for a huge solar forge.
Here's what you do: Draw an arc on a large sheet of graph paper with a radius of about two meters or whatever you want the focal length of the lens to be (For reasons I won't explain, the minimum distance, or focal length, from your lens to your work is the square root of three times the radius of your lens, so about 1.7m for me, but I'm doing 2 for smiplicity). You don't need to draw a whole circle, just the first 45 degrees or so. The graph below uses the first 1.4 horizontal meters.

Then, you'll cut that paper into strips. Your strips will each have a little segment of the arc on them. Each strip's arc segment must be of equal height--a height less than the thickness of your plexiglass. I'll be using 1/4" plexiglass, so my arc heights will likely be 3/16" tall. (I may have to adjust that after producing the first prototype, provided I ever get around to making this.)
They'll make a toothy pattern like this...

...but with a lot more teeth. Scores of them. This series of arcs (plus the vertical lines that connect them) is a tooth pattern you will carve into the backs of the sawblades, which you will use to scrape a fresnel pattern into your plexiglass sheets. Take utmost care that the tops of the red arc segments line up perfectly. The power of this lens is dependent on your accurate of reproduction of this arc tooth pattern.
You turn this pattern into a circular inscription on your plexiglass by scraping it in with metal scrapers you make out of the sawblades. Clear-tape that tooth-pattern template onto your sawblades--however many sawblades it takes to equal the length of the pattern. Use something that can cut steel, like a triangle file (hard way) or a dremel (easy way), to cut your jagged line into the toothless back of the sawblades. (You could use the toothy side of the blades, but you'd have to cut off all the teeth first and then file the blade edge flat!) You will also need to cut the ends off of the sawblades shere they mount to a saw. Choose a spot where they don't interrupt your arc pattern and make sure they're flush, butting up against each other. Now you have a line of two or three scrapers that will cut your plexiglass into three, quarter-circle Fresnel lenses. Next, you'll mount them on a beam we will call a "scraper arm."
One of your five pieces of lumber should be a very strong piece of hardwood if you can afford it, but don't break the bank. This piece must be a few inches longer than the sawblades combined. Flatten one of the long, narrow edges of this piece of lumber as perfectly as you can. I reccomend using a jointer, but whatever floats your boat. That flat edge will be the downward-facing edge of your scraper arm and will be nearest the plexiglass.
Mount the scrapers contiguously, centered in the middle of your piece of lumber, on one of the faces of the board adjacent to the flat edge, nice and tight, like this:

You definitely need to make sure the nadirs of the valleys between the teeth (which should all form a straight line) match up with the flat edge of the lumber.
And you can't have those scrapers wiggling or moving about or you'll spoil the whole thing! You can drill holes in them and screw them right onto the wood, but I would use some kind of bracket--you need to be sure they're straightly mounted or you will lose lens power, and (unless you're so clever with a countersink that you can line the hole up perfectly) that means you'll want to mount them with something that's very, very strong but still adjustable. Now your scraping arm is complete!
To mount the scraper arm properly in your plexiglass for scraping purposes, you'll need to drill a 1/4" hole in it near one of the corners. Make that hole equidistant (maybe 1") from each edge to save facepalming later, like this black dot:
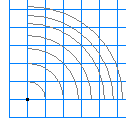
(Those gray arcs represent the grooves you'll be scraping into the plexiglass with the scraper arm.)
Next, you need to place the 1/4" brass rod in the scraper arm at the inside end (the end nearer the center of the circle--the one with the wider teeth), pointing down so you can plunk it down into the hole in the plexiglass. In order to do this, you'll have to add a sufficient block of wood to the saw-blade-mounted face of the scraper arm. Otherwise you'd only get half a hole. Also, you'll have to cut 1/8" off the inside end of the blade so that the center of the brass rod is truly the center of the radius of your fresnel cutting pattern. Secrure the brass rod any way you like so that it won't wiggle out or fall through. You could use a bolt for the rod to begin with, I guess. Heck, it doesn't really have to be brass. Brass just looks awesome. Go ahead and use a bolt; that way, it will have a head on it and won't fall through. :-)
Then you mount the "brass rod" in that hole in one sheet of plexiglass and scrape away in a radial fashion. This may take hours, but elbow grease is free. Don't exert more cutting pressure in the center than you do at the radial end, but it's okay to exert more pressure at the radial end than at the center. Best is to apply even pressure, but that's how to err on the side of caution.
So you scrape and scrape until you have four plexiglass panels that have become quarter-circles forming a huge Fresnel lens. YAY! Then you use your other four pieces of wood and the two cross-braces to build a frame. Don't worry, the wood won't burn unless it's near the focus of the lens. So you can have the frame near or touching the lens without danger, and even obscuring part of it is fine--you'll only lose lens power proportional to the surface area of the lens covered. So if you need to make a framework that has a window-frame pattern, that's a-okay.
You'll need to polish this thing so it's bright and clear. You can either scrub with a cotton ball for six weeks or use a cotton buffing wheel and a power drill. Whatever floats your boat.
Now you have an enormous, silent engine of destruction that turns the sun into your own Hephaestean flame. Get it high enough off the ground, point it at the sun (Fresnel teeth facing the sun) and burn, baby burn! Note: it will oxidize steel more than a blacksmith's forge because no methane will be protecting your work.
This is a good way to go because once you have that scraper arm, you basically have a factory for building these beasts! It's also a scalable model. You could make a two-by-two-meter one like this, or a five-by-five with the same principles. You'll have to re-do the math yourself, though.
And you're more than welcome to buy a refocusing lens and turn that solar power into a light beam instead of letting it dissipate back into space. It's the next best thing to a laser, and actually much hotter. But I'll let you figure that one out yourself.
No comments:
Post a Comment